Docker - Notes
Introduction to Containers
Application and libraries compatibility with an underlying OS for creating application stacks is an issue. This compatibility matrix is also called The Matrix from Hell. Also, for new developers, they have to go through complex setup steps. Using Docker containers, the application compatibility issue is eliminated as each application runs in an isolated container with the required libraries, processes, etc. irrespective of the underlying OS.
Docker utilizes LXC containers.
For all Linux operating systems, the kernel remains the same, but the software installed on top of the Kernel is what differentiates the different systems.
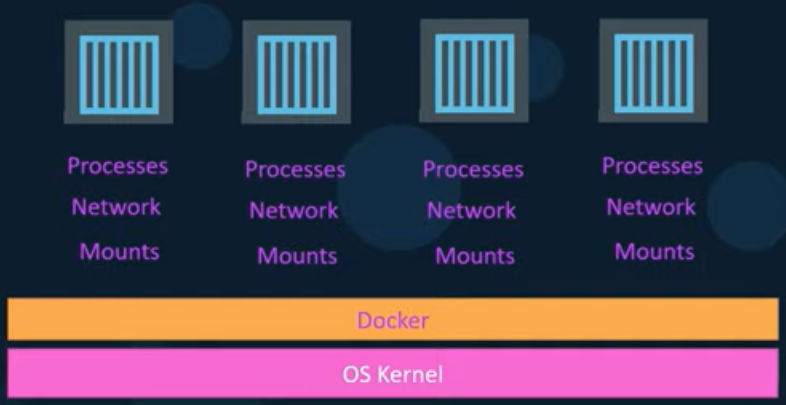
Docker containers on a host share the underlying Kernel. Docker can run any flavor of OS on it as long the kernel of the OS matches the underlying OS kernel. This prevents running Windows-based container on a Linux docker host. When docker is installed in Windows, to run Linux containers, in this setup actually Windows runs the Linux container inside a Linux VM under the hood.
Unlike hypervisors, Docker is not meant to visualize different operating systems on the same hardware. The main purpose of docker is to package and containerize applications, and to ship them and run anywhere, anytime.
Containers vs Virtual Machines
| Containers | Virtual Machines |
|---|---|
| Docker is installed on the OS. It manages containers which manage their own libraries and dependencies. | Hypervisor runs on the hardware, and manages Virtual Machines, each with a different OS. |
| Requires very low disk space. | This leads to additional consumption of hardware resources, such as disk space. |
| Fast start-up time | Complete isolation. |
| Less isolation because of running on the same kernel. |
The environment structure cannot be discussed around either containers or Virtual Machines, but in actual, it is containers and Virtual Machines. Many different virtual machines can exist on one piece of hardware, and all running separate docker hosts.
This way, the advantages of both different technologies can be utilized, Virtual Machines can be used to easily commission and de-commission docker hosts, and at the same time easily provision docker applications and scale them accordingly. In this setup, the Virtual Machine requirement will still be less as compared to an all VM environment.
Most organizations have their product images available in the Docker Hub which is the Public Docker registry.
To bring an application up -> docker run. For example, docker run ansible.
If there is a requirement to run multiple instances of an application, simply execute multiple docker run commands and implement a load-balancer which is front facing.
Container vs Image
An image is a package or a template. It is used to create one or more containers.
Containers are running instances of images that are isolated and have their environment and set of processes.
In a DevOps environment,a dockerfile is used to create an image for applications. This image can run on any docker host, and is guaranteed to work in the same way.
Getting Started with Docker
Community edition is the free version of docker available for the community.
Enterprise edition is the certified and supported container platform with enterprise level add-ons such as image security, etc. It is Paid.
Community edition is available on Linux, Mac, Windows and Cloud platforms such as AWS.
Install Docker
Download the community edition from docs.docker.com for Linux depending upon the supported OS platforms.
- Uninstall any older version of Docker if it exists.
- Install docker using the convenience script which installs all the pre-requisites and Docker.
Commands
docker version
Docker Hub => https://hub.docker.com
docker run <image_name> => Runs an already existing docker image on the local hosts if it exists, otherwise downloads and runs it from the docker hub. Any subsequent runs use the same downloaded docker image.
docker ps => Lists all running docker containers, along with basix information, such as container ID, name, status,etc.
A random ID and name is generated for each docker container.
docker ps -a => All running and exited containers.
docker stop <name/ID> => Stop a running container using it’s ID or name
docker rm <name/ID> => Removes a container.
docker images => See a list of available images and their sizes.
docker rmi <image_name> => Delete an image from the host. All containers and dependencies must be deleted first.
docker pull <image_name> => Downloads/Pulls an image on the local hosts, so that when the docker run command is executed for the container, it instantly starts up with the downloaded image.
docker run ubuntu => Runs an instance of ubuntu and exits immediately.
Unlike Virtual Machines, containers are not designed to run an operating systems, but they are meant to run a specific task or process such as host a web server or run a task. Once the task is complete the container exits. A container only lives as long as the process running inside it is alive.
With the docker run ubuntu command, docker simply runs an image of Ubuntu OS, but this command run by itself will exit immediately as there is not process/task running inside the image. Therefore, to execute a command for a specific base OS/image use the docker run command along with the name of the OS image followed by the command for the task. Example , docker run ubuntu sleep 5. In this example, the container will run the sleep command, stay on for 5 seconds and exit after that interval on the completion of the task.
docker exec <name/ID> <command> => Executes a command inside a running container. For example, docker exec container1_name cat /etc/hosts.
By default, a docker image which runs a task when evoked using the docker run command will stay on the terminal in the foreground and present it’s output. It can be exited by pressing Ctrl+C.
docker run -d <image_name> => Runs application in detached mode, i.e, in the background.
docker attach <name/ID> => Attach a container running in the background to the terminal.
When supplying the container ID to a command, you can simply enter only a few characters from the beginning of the ID, as long as there is no similarity.
docker run <image_name>:<version> => Specifies the version of the docker image to be installed and run. This kind of specification using a colon is called a Tag. Not specifying any tag defaults to latest in this case.
All supported tags for an image can be found on the image’s page under docker hub.
By default a docker container does not listen to standard input even if it’s attached to a terminal. It runs in a non-interactive mode. To provide the input, it must be mapped to the docker container run command using the -i parameter.
The -i parameter means for Interactive. But this may not display any prompt output which is because, the -i parameter runs the container detached. To resolve this, use the -t option for attaching to the terminal.
docker run -it <image_name>
Every docker container is assigned an IP by default, which is accessible only within the docker host. To access a containerized application running on a docker host from a different host. there must be a port mapping between the docker container and the host.
docker run -p <host_port>:<container_port> <image_name>
Using the above method, different instances of the same application can be run on the same host, and mapped to different host port numbers.
The port on the host to which the container is mapped must by free and can only be used for one container.
A docker container has its own isolated filesystem in which the application’s data is stored. Deleting a container also removes all the data of the container application stored inside the container filesystem. To persist data, a directory outside the container on the docker host can be mapped to a directory in the container filesystem.
docker run -v <host_directory_path>:<container_directory_path> <image_name> This way the docker container will implicitly the mount the external directory to a folder inside the docker container. All of the data going to that directory will be stored on the external path and this will remain even if the docker container is deleted.
docker inspect <name/ID> => Returns detailed container information in a JSON format.
docker logs <name/ID> => Display standard output of a detached container.
docker run -e <variable_name>=<value> <image_name> => Assign the value of an environment variable used inside a docker application.
The docker inspect command will also display any information for the environment variables used in the docker application.
Create a Docker Image
You may containerize an application for your convenience if it is not available on the docker hub, or if you want to ship a containerized version of your application.
-
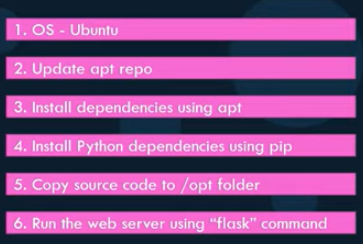
First start by identifying the steps involved in the setup of your application, starting form the OS to the configuration files. Identify the manual steps required in the application’s setup. For example, to containerize a python web app using the flask framework, the following steps would be involved:
-
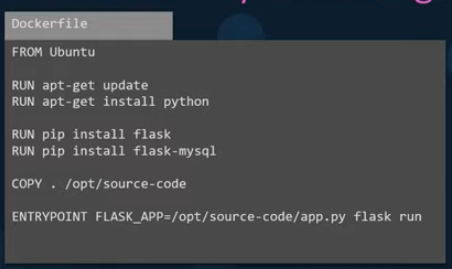
Create a Dockerfile and add all the required steps to create the application:
- Build the image using the docker build command and specify the Dockerfile and the tag name for the image. This will build on the image on the local host.
docker build Dokcerfile -t mylab/my-custom-app - To make it available publically,push the image to the docker registry.
docker push mylab/my-custom-app.
Dockerfile
A Dockerfile is a special file written in a format that Docker can understand. It is written in an INSTRUCTION ARGUMENT format. Everything on the left is an instruction, which instructs docker to perform a specific action when building the image using the arguments next to the instruction on the same line.
| INSTRUCTION | Description |
|---|---|
| FROM | Base OS/Image to start from. Every docker image must be based off another image, either an OS or an image that was created based on another OS. All dockerfiles must start with the FROM instruction. |
| RUN | Instructs Docker to run commands on the base images. |
| COPY | Copies files from the local system to the container’s base OS filesystem. |
| ENTRYPOINT | To specify a command which is run when the image is run as a container. |
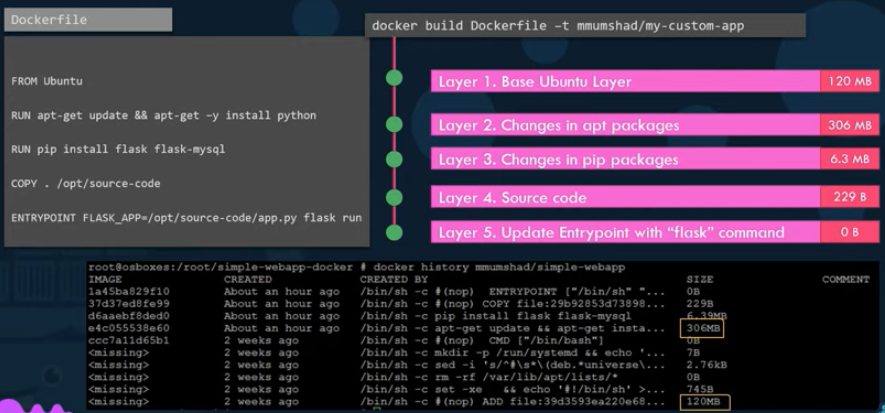
Docker builds images in a layered architecture. Each instruction creates a new layer and it only stores the changes made from the previous layer. Therefore, each layer has its own size which is independent of other layers.
docker history <image_name> => Displays the size of different layers when the image was built.
On running a docker build, all the built layers are cached, which allows restarting build from the last active steps if the build fails or new steps are added. Rebuilding images is faster due to this reason as it does not run the cached steps every time.
CMD vs ENTRYPOINT
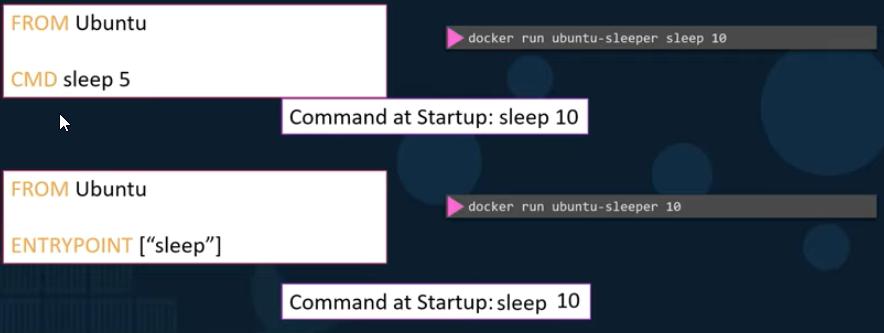
When a CMD instruction is defined in a Dockerfile, the argument to CMD is the command that is executed each time the application is run in a docker container using docker run.
For example, the following dockerfile will run the sleep 5 command in an Ubuntu OS.
FROM Ubuntu<br></br>CMD sleep 5
The syntax for the CMD instruction can be one of the following:
CMD <command> <param1>CMD ["<command>", "<param1>"]=> In a JSON array format, the first element of the array must be an executable.
When a command is passed as an argument to the docker run command for an image, the command line argument then overrides the CMD defined command inside the dockerfile.
As an example, the command docker run Ubuntu sleep 10, will run the command sleep 10 irrespective of what is defined in the CMD instruction. To deal with this issue, use an ENTRYPOINT, which is not overridden using the above command.
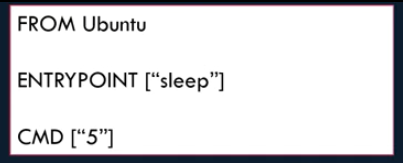
To get user input for the ENTRYPOINT command, both ENTRYPOINT and CMD can be used in conjunction with each other. Use ENTRYPOINT for the actual command, and define a parameter using CMD. This way if the user does not pass any command line arguments the CMD value will be used as the default. When using this method, both ENTRYPOINT and CMD must be defined in a JSON array format.
docker run --entrypoint <entrypoint_command> <image_name> => Overrides the entrypoint defined in the image.
Docker Networking
When docker is installed, it creates three network automatically:
- Bridge
- None
- Host
docker run <image_name> --network=<net_name> => Attach a container to a specific network interface. For example, docker run Ubuntu --network=host.
Networks
Bridge:
Private internal network created by Docker on the docker host. All containers on the host are by default attached to this network. Containers get an internal IP address.
Containers in a bridged network on the same host can access other. To access these containers from a different machine/host, the docker container ports must be mapped to the host ports.
Host:
Externally reachable network without the need of port mappings. Unlike a bridged network where different host ports can be mapped to container ports, in a Host network applications that use the same port cannot be run simultaneously as there is no port mapping to differentiate the externally accessible ports. Containers use the Host’s IP address.
None:
No network access. Containers run in an isolated environment.
User-defined networks:
docker network create --driver bridge --subnet <subnet_address> <network_name> => Create an isolated bridged network on the docker host. A container in this network will only be accessible by another container residing in the same network.
docker network ls => List all available networks
The docker inspect command will also display network information for a running container.
DNS
All containers in a docker host can resolve each other using the container name. Docker has a built-in DNS server that handles these DNS queries.
Docker uses network namespaces to create a separate namespace for each container. It then uses virtual ethernet pairs to connect containers together.
Docker Storage
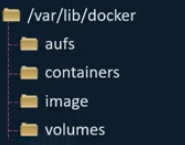
By default, all of Docker’s data for images and containers is located at /var/lib/docker on the host’s filesystem.
Due to docker’s layered architecture,a docker build caches all different instructions in layers, this way when a Dockerfile is rebuilt or a Dockerfile which has some similar steps is used, docker only runs the changes, and re-uses the cached versions for similar steps. This saves disk spaces and also makes the build process faster.
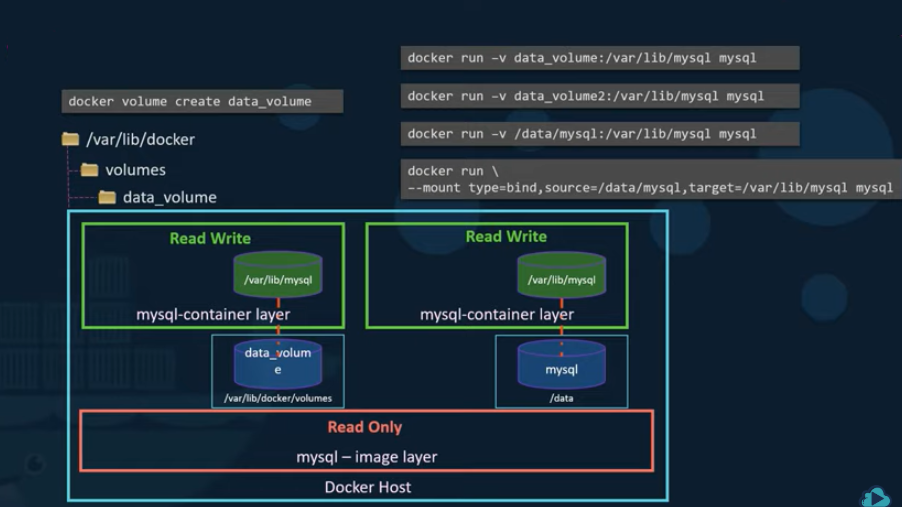
When docker build command is run on a dockerfile, different image layers are created for all instructions defined in the Dockerfile. When the build is complete, the image layers cannot be modified and are read-only, the only way to make changes is by initiating a rebuild.
When a docker run command is run for an image, Docker then creates a new writable Container Layer on top of the image layers. The writable layer is used to store data generated by the container. The life of this layer is only as long as the container is alive. Destroying a container also destroys it’s related container layer.
When a file which is part of the image layer is modified by a container, it actually creates a new copy of that file in the read-write container layer. This way the image layer contents always stay untouched and thus allow for consistent image sharing between containers based off the same image. This mechanism is called COPY-ON-WRITE.
For container data to persist even after the container is destroyed, a persistent docker volume may be added to the container.
docker volume create <volume_name> => Creates a persistent volume to be used by containers under, /var/lib/docker/volumes/<volume_name>.
docker run -v <volume_name>:<container_mount_path> <image_name> => Mounts a docker volume to a directory path inside the containers read-write layer. For example, docker run -v data_volume:/var/lib/mysql mysql. This method is called Volume Mounting.
If you try to mount a volume that does not already exist, docker will automatically create a volume by the given name and mount it to the container’s filesystem.
To use an external path on the host instead of docker volumes, replace the volume name by the absolute pathname of the directory to be mounted on the container’s filesystem. For example, docker run -v /data/mysql:/var/lib/mysql mysql. This type of mount is called a Bind Mount, where a mount to an existing pathname on the docker host is added to a container.
docker run --mount type=<bind/volume>,source=<source_path/volume>,target=<container_mount_path> <image_name> => The preferred way to mount volumes and path is by using the –mount option instead of -v. As this option provides more verbose options and configurations to be done for creating mounts.
Storage Drivers
Docker uses it’s storage drivers to perform all above defined storage operations including the maintenance of the layered architecture. The selection of the storage driver depends on the underlying OS being used. Docker will automatically choose the best storage driver depending upon the Operating system.
Supported storage drivers: AUFS, ZFS, BTRFS, Device Mapper, Overlay, Overlay2.
Docker Compose
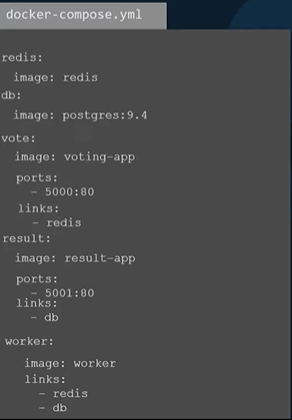
Docker compose can be used to run an application stack. The configuration options of all the different application can be entered in a docker-compose.yml file in YAML format. On running docker-compose up, all different container defined in the compose file will be provisioned simultaneously. This allows for better configuration management through a single setup file. Docker compose can only be used to provision containers on the same docker host.
docker-compose up
Approach
- Figure out the different docker run commands required to run all the different applications on a host.
- Identify the links and relationships between different applications.
- Put the data defined from above steps in a docker-compose.yml file in YAML format.
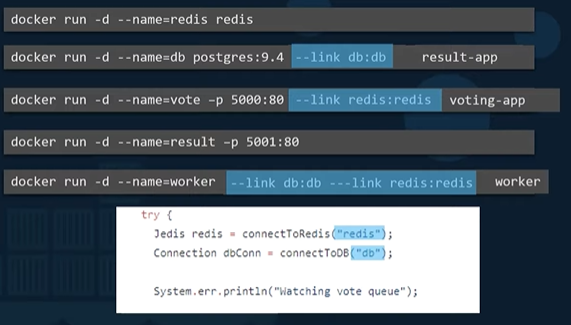
docker run -d --name=<container_name> <image_name> => Run a container in detached mode and assign the specific name to the container.
For provisioning containers using docker compose, it is necessary to self-define the names of containers, so as to properly link the containers together using the appropriate names.
–link
link is a command line option for docker run to create a link between two different applications and resolve dependencies. For example, a web server container that requires a backend database, must be linked to appropriate database container and the actual database name. To use link, determine the value the container is looking for to get the other application, then assign the dependent container’s name to that value using –link.
docker run -d --name=<container_name> --link <code_value>:<container_name> <image_name>
The use of –link for creating dependencies has been deprecated and may removed from a future release. Docker swarm and networking provide better ways to resolve such dependencies.
docker-compose.yml
If the name of a link value and the container to be used with is same instead of using the colon only one one entry can be defined. For example, db instead of db:db.
<container1_name>:
  image: <image_name>
<container2_name>:
  image: <image_name>
  ports:
    - <host_port>:<container_port>
  links:
    - <code_value>:<container_name>
Example,
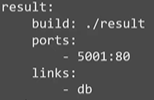
For building a custom image using a docker compose file, place all the required files for the image in a folder along with it’s Dockerfile and replace the image step with a ‘build’ value in the docker-compose file.
Example,
Docker Compose - Versions
Docker compose files have evolved over time with an addition of a wide variety of supported options.
The version 1 of docker file didn’t have support for specifying the type of network to be used for the container, the order in which the different containers in the compose file should be provisioned. All containers are attached to the default bridge network.
With version 2 and above, support for many different options such as the ones defined above was added. Also, the syntax of the docker compose file changed a little.
- The change involve putting all the container information under a parent section called services.
- Docker identifies the version of dockerfile being used from the value of the version definition.
- Docker creates a new bridged network and places all the containers inside that network, this way containers can communicate with each other just by using each other’s container names, eliminating the use of links.
- To specify a startup order for containers, the depends_on property can be added to indicate the container which is started before the specified container.
The latest version of dockerfile version 3, which is similar to version 2 and requires the version property to be set as 3. This version added support for Docker Swarm.
With version 2 and above, different bridged networks can be created to isolate different containers. For example, in an application stack using a front-end web server plus a backend database. The backend database does not need to be exposed and hence can be a part of an isolated network whereas the front-end web server needs to be a part of both the front and the back end networks to allow user access as well as interaction with the database.
version: 2
services:
  <container_name>:
      image: <image_name>
      networks:
        - network1
networks:
  network1:
  network2:
Docker Registry
Docker registry is the central repository for all docker images. When defining the image name to be used for a container, the syntax is always <user/account>/<image/repo>. If a single name instead of the slash differentiated account and image name is used, docker assumes that both the values are same. For example. image: nginx => image: nginx/nginx.
Docker Hub is docker’s default registry and is always used for downloading images unless a different location is specified. DNS name for docker hub is docker.io.
To specify a different registry replace the image name by <registry_dns_name>/<user/account>/<image/repo>. For example, Google has its own registry where a lot of kubernetes images are hosted. gcr.io/kubernetes-e2e-test-images/dnsutils
A Private Docker Registry may be used to host images of applications that are built in-house and sold to customers. To pull or push images from/to a private repository, a sign in to the private registry is necessary.
Cloud providers like Azure, GCP and AWS provide private registries to users when they sign up.
docker login <private_registry_dns> => Login to a private registry before being able to pull and push images.
docker run <private_registry_dns>/<repo_name>/<image_name> => Run a container from an image situated in a private registry.
Host Private Registry
The private registry itself is an application and is available on the docker hub. It exposes it’s API on port 5000.
docker run -d -p 5000:5000 --name registry registry:2=> Runs an instance of a private registry in a container internally on host’s port 5000 and names the container ‘registry’.docker image tag <image_name> <registry_hostname/IP>:<registry_port>/<image_name>=> Tag the local image with the public registry’s address. When the first part of the tag is a hostname and port, Docker interprets this as the location of a registry, when pushing.docker push <registry_hostname/IP>:<registry_port>/<image_name>=> Push the image to the private repository.docker pull <registry_hostname/IP>:<registry_port>/<image_name>=> Pull the image from the private repository.
Docker Engine
Docker Engine refers to docker installed on a host. When docker is installed on a host, it installs three components: Docker CLI, REST API and the Docker Deamon.
The docker daemon is the background process that manages docker objects such as images, containers, volumes, networks, etc.
The REST API is the API interface that programs can use to talk to the daemon and provide instructions.
The Docker CLI is the command line interface used to perform docker operations from the command line. It uses the REST API to interact with the docker daemon.
The Docker CLI can exist on a different host than the API and the daemon, and can still be used to interact with the remote docker engine. For connecting to a remote docker engine use the -H option with the socket address. For example, docker -H=<hostname/IP>:2375 run nginx, will run an nginx container on a remote docker engine.
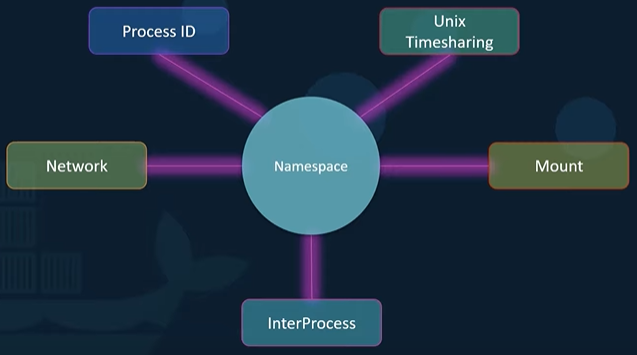
Docker uses namespaces to isolate work space for different containers. Process IDs, Networks, Mounts, Unix Timehsharing, etc. are created in their own namespaces, thereby isolating different work spaces/containers.
With process ID namespaces each process can have multiple PIDs associated to it. Creating a container starts a new process on the underlying host with a unique PID, and inside that container, new process IDs are created starting from PID 1. These are only visible inside the container, which makes the container think that it has its own root process tree and is itself an independent host.
The same service that is running inside the container, can also be found running on the underlying host, but with a different PID.
By default, there is no resource(CPU, memory) restrictions for containers when they are running. Docker uses cgroups(control groups) to manage the resources allocated to each container.
docker run --cpu=<host_cpu_fraction> <image_name> => Defines the maximum amount of CPU resources of the host that the container can use. A value of .5 means that the container is limited to using at a maximum of 50% of host’s CPU.
docker run --memory=<memory> <image_name> => Maximum amount of memory allocated to the container. Value Example, 100m.
Docker on Windows
Docker on Windows using Docker Toolbox
This was the original support for Docker on Windows. A virtualization software can be installed on Windows, in which a Linux VM running Docker can be used. But this would still only limit docker to be able to use the Linux kernel and hence only deploy Linux based containers. This setup can however be made easy using the Docker Toolbox which is simply a Windows executable and includes a set of tools including, VirtualBox, Docker Enginer, Docker Machine, Docker Compose, and Kitematic GUI. This will deploy a lightweight virtual machine on Virtual Box with docker running inside it.
Docker Toolbox is a legacy solution.
Docker Desktop for Windows
Docker for Windows uses Windows Hyper-V as the virtualization solutions. It will still provision a Linux VM, but this time on Windows Hyper-V with docker running on it instead of VirtualBox. Docker Desktop for Windows is only supported for Windows 10 Enterprise/Profession or Windows Server 2016 which come with Hyper-V support.
With Windows Server 2016, Microsoft introduced support for Windows Containers, which can be provisioned through Docker.
Docker Desktop, by default uses Linux containers, must explicitly Switch to Windows Containers to start using windows containers.
There are two types of Windows containers:
- Windows Server: Works similarly as Linux containers.
- Hyper-V Isolation: Each container is run within a highly optimized virtual machine guaranteeing complete kernel isolation from the underlying host.
Available Windows Base Images:
- Windows Server Core: Non-Lightweight solution.
- Nano Server: Headless deployment solution for Windows Server running at a fraction of size of the Windows Server.
Windows 10 Professional/Enterprise only supports Hyper-V isolated containers.
VirtualBox and Hyper-V cannot co-exist on the same host.
Container Orchestration
Container orchestration is a solution that provides with a set of tools and scripts to managed and host a large number of containers in a production environment. A container orchestartion tool consists of multiple docker hosts that can host containers. It easily allows deployment of a large number of containers using single commands. Orchestration tools can also automate containerization process and advanced network management between different container hosts. Container Orchestartion tools provide features like Load Balancing, Fault Tolerance, Configuration management, etc.
Docker swarm lacks some advanced auto scaling features. Kubernetes is arguably the most popular container orchestration tool providing many advanced features with support for many different vendors.
