Foreman Architecture and Design
Components
A complete Foreman Installation includes the following components:
- Foreman Server - Holds all the different components together. Main orchestration server.
- Puppet CA - Certificate management, including signing of CSRs.
- Puppet Master - Configuration management server. Maintains desired state for all nodes.
- Compute Resource - Base Hyper-visor that controls all virtual machines
- Smart-Proxy - Smart-Proxies are extensions of Foreman which talk to different components in order to perform the operations requested by the Foreman server. For instance, a foreman DHCP proxy will be responsible for configuring DHCP records of the nodes managed by Foreman. There’s a wide range of plugins available for all kinds of Smart-Proxies to work with different service providers. Smart-proxies are very crucial for successfully creating new Virtual Machine instances from inside Foreman. Following are the available proxies;
- DNS - Manages DNS Records of nodes.
- DHCP - Manages DHCP Records of nodes.
- TFTP - Stores PXE boot files.
- Puppet CA - Manages certificates of nodes.
- Puppet - Manages configuration of nodes after they have been provisioned.
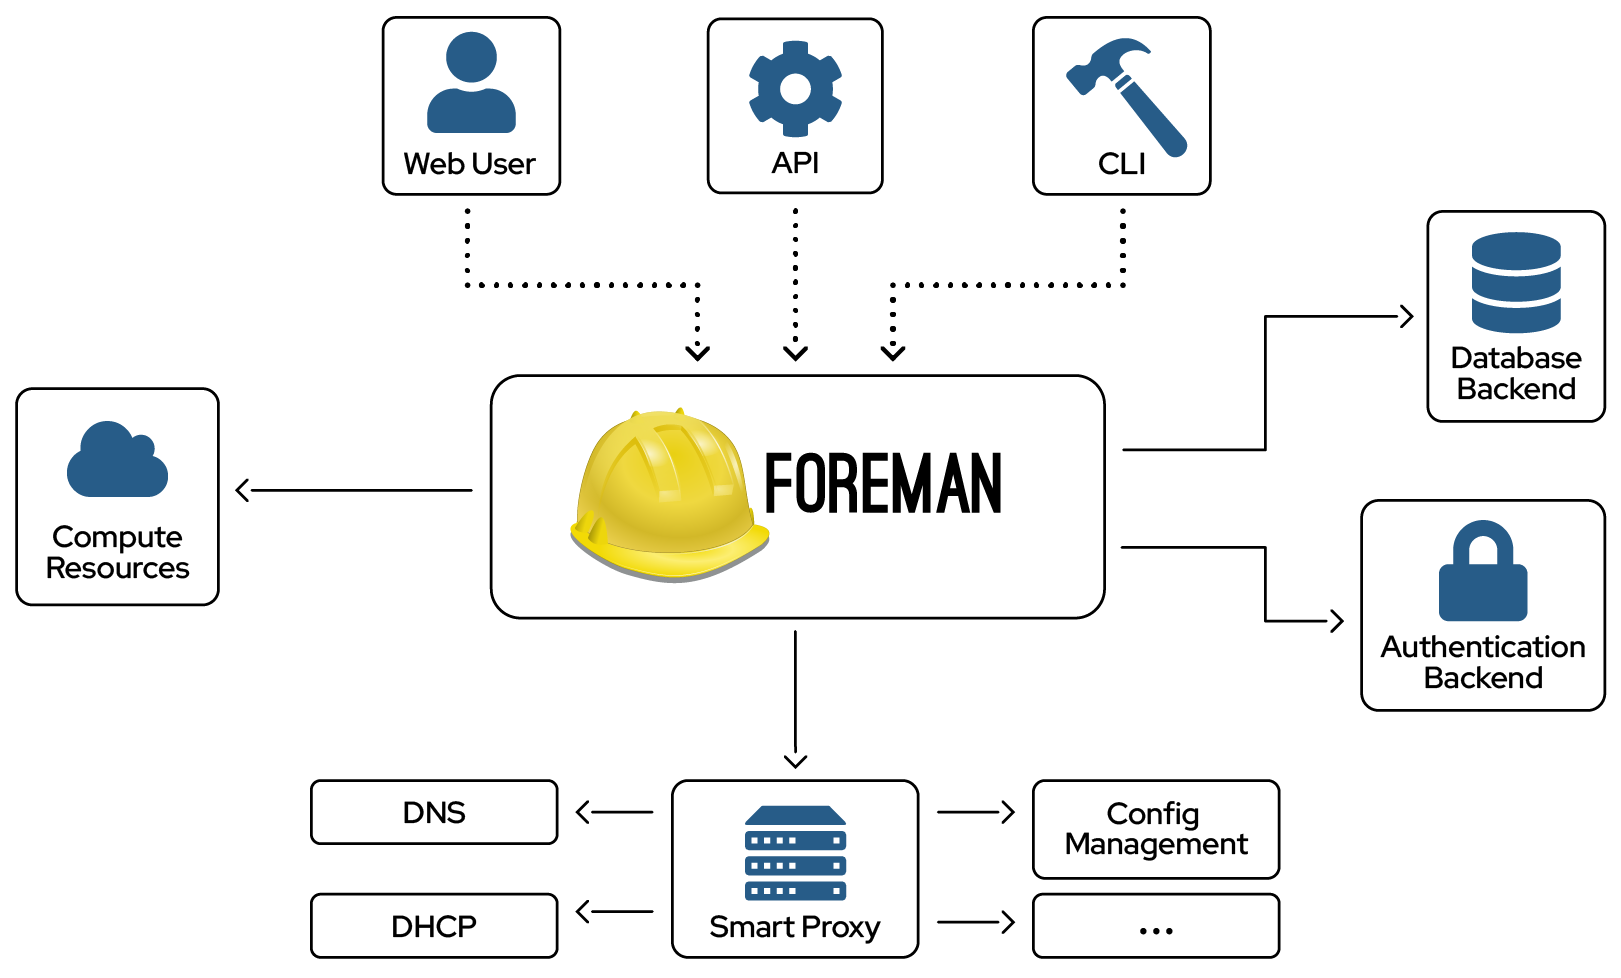
All different components are held together by the central Foreman server, which can be a standalone instance or a cluster of Foreman Servers.
Different foreman instances providing different or same operations can be joined together in a cluster-like environment. This type of setup helps in load balancing in a heavy-use environment.
Workflow - Unattended Installation
One of the strongest functions that foreman provides is Unattended/One-Click Operating System Installation. To Successfully spin up new VMs from the Foreman Web GUI, all different components must be linked together properly and should allow smooth transition to the next steps of the workflow.
The following operations are carried out in a sequential manner whenever a Virtual Machine is provisioned on a VMWare Hypervisor by Foreman using PXEBoot.
- On the New Host page of the Web GUI, the configurations are entered for the new host.
- DCHP Smart-Proxy contacts the DHCP server to find an unused IP Address and reports it back to Foreman.
- The IP address is added to the configuration and is displayed under the Network section on the configuration page.
- Clicking Submit initiates the provisioning process.
- Foreman contacts the Compute Resource, in this case vSphere, to create a Virtual machine instance with the specified configurations.
- vSphere registers the new VM and reports it’s MAC Address toForeman.
- DHCP Smart-Proxy creates a static entry on the DHCP server for the new MAC and IP addresses. The DHCP entry also specifies the TFTP and PXE filename options. The TFTP address is that of the TFTP proxy and the PXE filename is the one specified during New Host Configuration under the Operating System tab.
- DNS Smart-Proxy creates the relevant A and PTR records on the DNS server.
- TFTP Smart-Proxy creates the files necessary for PXELinux on the TFTP server.
- Foreman contacts vSphere to Power On the virtual machine.
- The powered on VM, sends a DHCP Request to the DCHP server.
- The DHCP server responds with the IP Address details for the related MAC, and also the TFTP server address and filename.
- VM requests the PXE profile from the TFTP server and the PXE profile is provided by the TFTP server based on MAC address.
- The PXE files point to the URL of the unattended scripts on Foreman, which are requested by the virtual machine to install the Operating System.
- The Puppet Smart-Proxy creates an auto-sign entry of the certificate for the first-time VM contact the Puppet Master for configurations.
- After the OS is installed, the VM informs Foreman through a ‘built’ URL.
- TFTP Smart-Proxy modifies the PXELinux entries for the OS so that the VM doesn’t perform PXE boot on next startup.
- The OS boots up for the first time, runs puppet agent and requests the configuration from the Puppet master with the respective catalog.
- Puppet Smart-Proxy sends the agent run report from the master to Foreman.
TFTP Smart-Proxy/Server Operations
- Call mkdir -p /var/lib/tftpboot/pxelinux.cfg if it does not already exist.
- Create a host-specific TFTP configuration file in /var/lib/tftpboot/pxelinux.cfg/01-XX-XX-XX-XX-XX-XX, named based off of the MAC address, using the associated PXE template.
- Call mkdir -p /var/lib/tftpboot/boot if it does not already exist.
- Download the OS specific kernel and initrd files using wget.
- The download URLs are derived from the installation media path, and OS specific log (see app/models/redhat.rb and debian.rb in foreman for examples of the gory details).
- The debian.rb file tries to guess if you want Ubuntu or Debian, based on the Name you give to your OS in the UI. If the name does not contain ‘ubuntu’ or ‘debian’, it may default to debian, hence fail to fetch the kernel/initrd.
- cd into /var/lib/tftpboot/boot and check that the filesizes are not zero. Check /var/log/foreman-proxy/proxy.log for possible errors.
- The exact wget command is
wget --no-check-certificate -nv -c <src> -O "<destination>" - At this point, the TFTP state is ready for the installation process.
- Once the host has completed installation, the OS specific installation script should inform foreman by retrieving the built URL.
- The host-specific TFTP configuration file is deleted.
- The kernel and initrd are not deleted, but left in place for future installs of the same OS and architecture combination. Please note that in the unlikely case that these files are modified, the simplistic freshness check of wget will likely get confused, corrupting the downloaded versions of the files. If this happens, you should simply delete the files and let them be re-downloaded from scratch.