Unattended Provisioning - Windows
Foreman can be configured to perform Windows provisioning in one of the two ways, either by using the wimaging scripts and modules created by the community or by integrating it with Windows Deployment Services & MDT. The wimaging source hasn’t been updated in a while so we will perform Foreman integration with the Windows Deployment Services.
In this guide, we will first setup the Windows Server side to be able to deploy VMs, and then integrate it with Foreman.
Pre-Requisites
- Unattended Provisioning - CentOS Linux
- Windows Server 2012 or later, with at least 100 GB of HDD space, 4GB memory and 2 CPUs.
Windows Deployment Services and MDT Setup
Install WDS
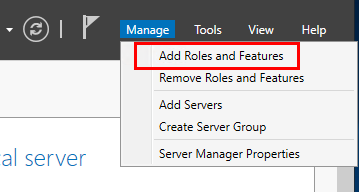
- Log in to a Windows Server and open Server Manager.
-
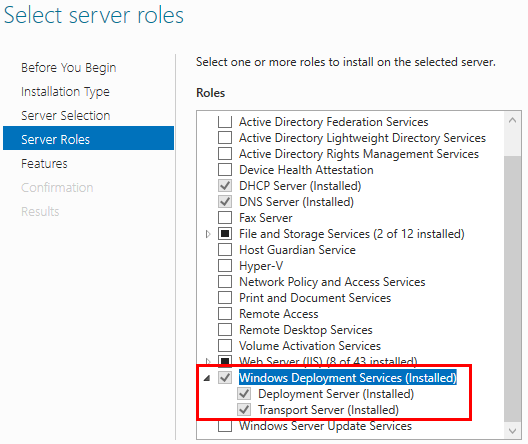
Select Add Roles and Features and pick Windows Deployment Services. Accept to install related features.
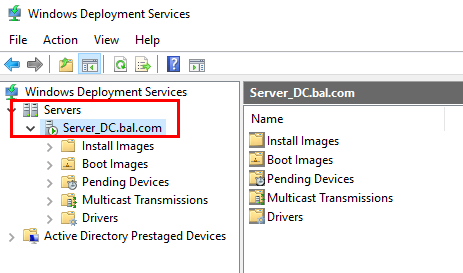
- Complete any Post-Installation steps required by opening Windows Deployment Services and then add the local server. It will create a directory structure of the necessary files. This may take a while to complete.
-
After the above steps, you should have a WDS structure similar to the following.
-
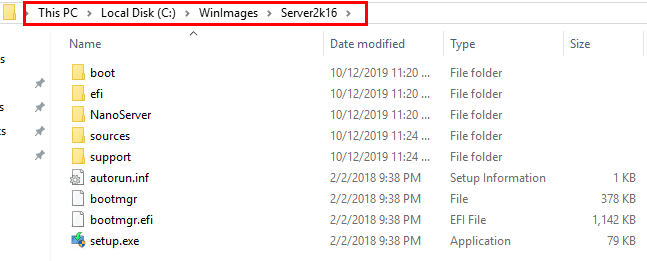
Extract the ISO files to a local folder on the Server. The location of the folder can be anywhere on one of the local drives. For example, create a directory C:\WinImages, inside which create different folders for OS specific extracted ISO files.
Install Microsoft Deployment Toolkit
- Windows MDT requires the Windows ADK(Assessment and Deployment Kit) to be installed first. Download and install Windows ADK for Server 2016 from here. Make sure to select the requried features as shown.

- Download and install MDT for Windows Server 2016 from this link. Accept the defaults for all the settings.
Configure MDT
MDT is managed through the Deployment Workbench. A Deployment Share is a basic unit that holds all OS data specific data. This data is later pushed to the Windows Deployment Services in the form of images. OS installation is carried out using these images. What MDT basically does is that, it pulls in the OS images from the extracted ISO folder, and creates a modified image by adding external data, such as drivers, application packages, etc. WDS carries out the deployment using these images.
- Create a new Deployment Share.
-
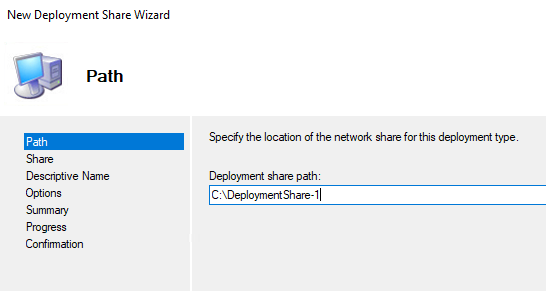
Set a path for the Deployment Share where you would like to store all the OS specific data.
-
Edit the share name. Deployed OS will contact this share address for images and other files.
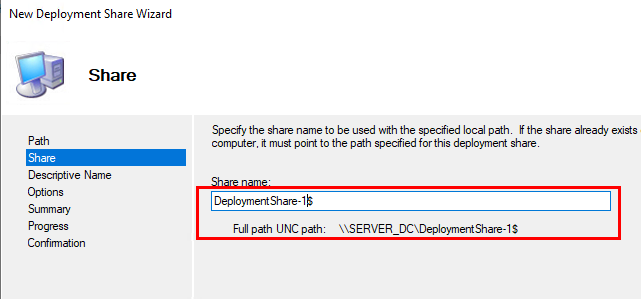
- Select the defaults and Finish.
-
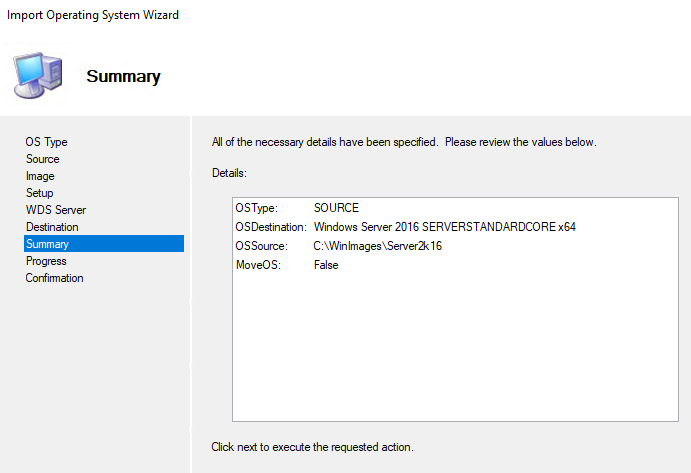
Lets add the Operating System to the Deployment Share. Right Click Operating Systems>Import Operating Systems. Since, we extracted the ISO files, select Full set of source files.
- The above step will import all the different Operating System versions present in the image.
- Create a new Task Sequence. A task sequence determines all the steps that are carried out during the OS install, it can be though of as the Provisioning Template used with Linux.
-
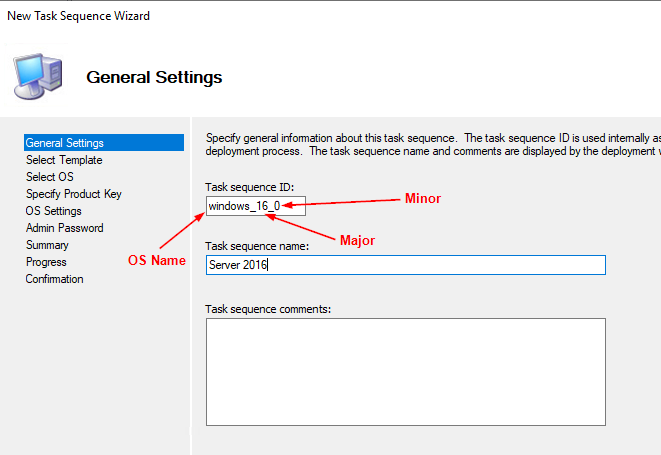
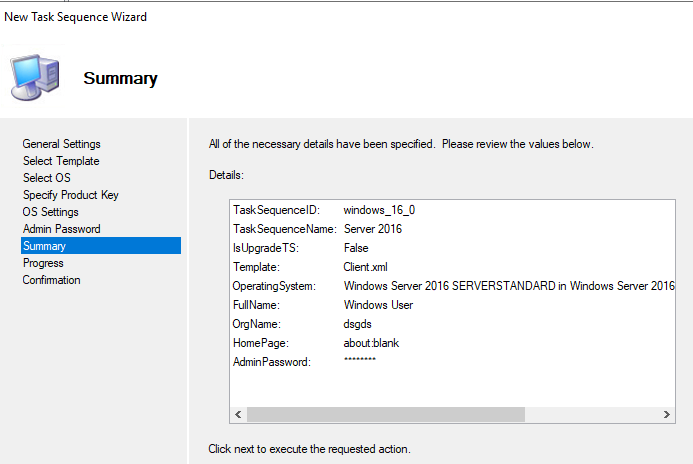
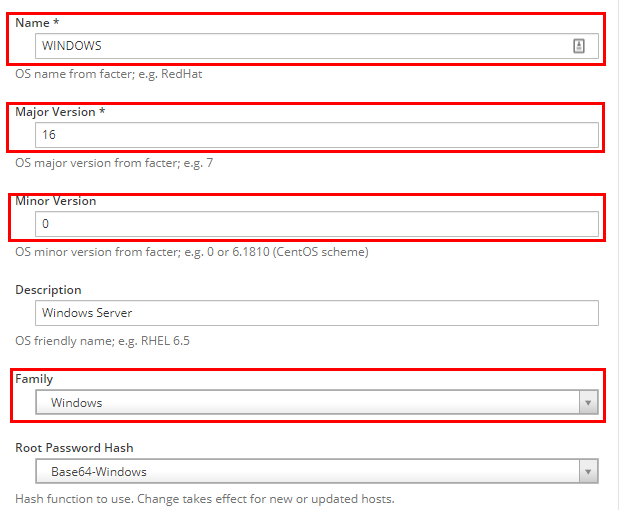
The Task sequence ID is very important for completing the integration with Foreman, as foreman will trigger the deployment on WDS using the Task Sequence ID and it must match the Operating System Name, Major and Minor versions defined in Foreman. We will enter the same information in Foreman later.
-
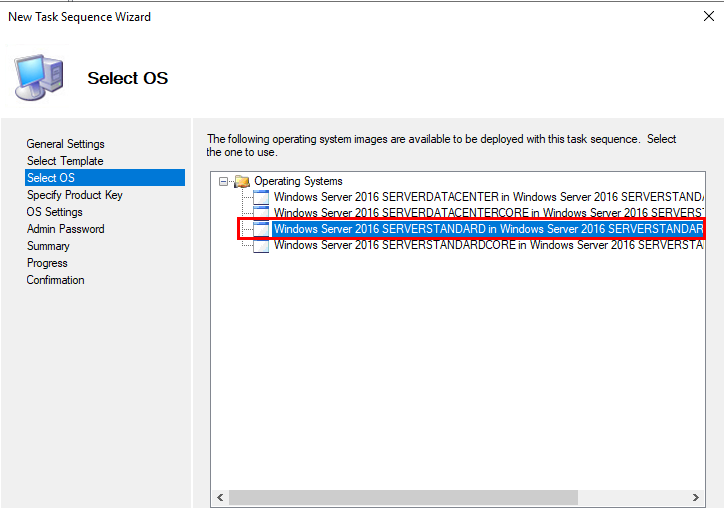
Select the Operating System to be used with the Task Sequence.
- Enter Product Key if you have one, Next.
-
Fill in the Organization details, administrator password and Finish.
-
Integration
The integration between Foreman and Windows includes the following parts:
- Foreman, creates the DNS, DHCP and PXE entries when a new host is added. The PXE file triggers the task sequence on the Windows server side.
- The WDS server runs the deployment task sequence, contacts Foreman for the Computer Name. - This will be done by adding the foreman URL to the hostname parameter.
- The task sequence run informs Foreman that the build is complete by triggering the ‘built’ URL. - This will be done by calling a powershell script as a step in the task sequence. We will enable the powershell feature in the Windows PE image for this purpose.
Windows Configurations
- Open the Deployment Workbench on the Windows Server, and got to the Deployment Share properties.
-
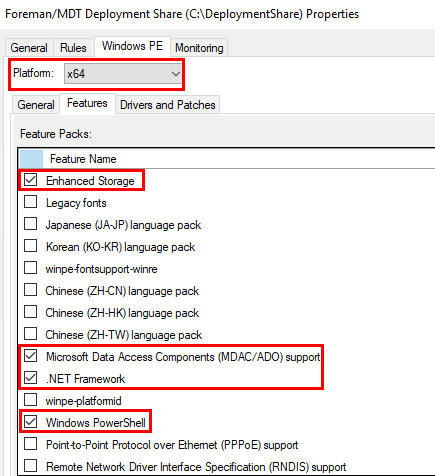
Under the Windows PE tab, select the x64 Platform. Select the Features tab and make the selections necessary for allowing the image to run a PowerShell script.
-
Enter the following data in the text box under the Rules tab. This part asks foreman for the Computer hostname.
[Settings] Priority=Default, GetComputerName, GetTaskSequence Properties=MyCustomProperty [Default] OSInstall=Y SkipCapture=YES SkipAdminPassword=YES SkipProductKey=YES SkipComputerBackup=YES SkipBitLocker=YES SkipBDDWelcome=YES SkipUserData=YES SkipComputerName=YES SkipLocaleSelection=YES SkipSummary=YES SkipTimeZone=YES SkipTaskSequence=YES SkipDomainMembership=YES TimeZoneName=Eastern Standard Time [GetComputerName] WebService=http://foreman-01.mydomain.com/unattended/provision Method=GET OSDComputerName=string [GetTaskSequence] WebService=http://foreman-01.mydomain.com/unattended/user_data Method=GET TaskSequenceID=string -
On the same screen, select Edit Bootstrap.ini and enter the following information. This part defines the root folder of the Deployment share and the user credentials for accessing it. The SkipBDDWelcome parameter skips the welcome screen. Any changes made to bootstap.ini will require the boot image to be modified, so it is suggested to keep this part short and store all other settings under the Rules.
[Settings] Priority=Default [Default] DeployRoot=\\SERVER_DC\DeploymentShare-1$ SkipBDDWelcome=YES UserID=myadmin UserDomain=mydomain.com UserPassword=P@ssw0rd -
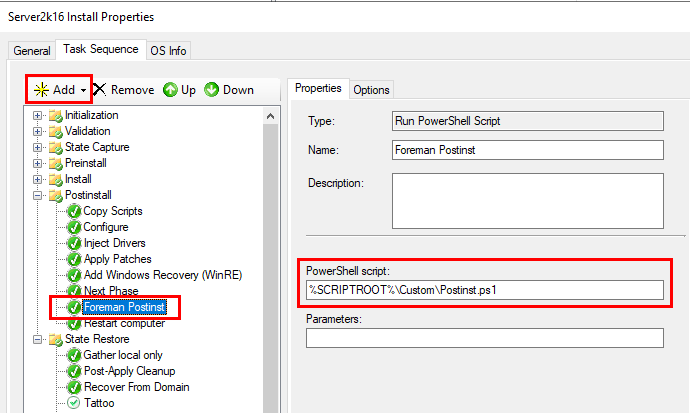
Create a PowerShell script that triggers the built URL and tells Foreman that the build is complete. This way when the computer is restarted it doesn’t go to PXE Mode again. Save the Script in a new folder in your Deployment share. For example: C:\DeploymentShare-1\Scripts\Custom\Postinst.ps1.
$r = [System.Net.WebRequest]::Create("http://foreman-01.mydomain.com/unattended/built") $resp = $r.GetResponse() $reqstream = $resp.GetResponseStream() $sr = new-object System.IO.StreamReader $reqstream $result = $sr.ReadToEnd() write-host $result -
Add the PowerShell script to the task sequence at the appropriate step in the sequence. Enter a UNC path and hit OK.
-
Build the necessary WIM image files. The image files will be based on all the settings and changes made in the previous steps inside MDT. This steps is time consuming as it builds images from scratch. Anytime you make a change to the Deployment Share this steps is required, but it may not be always time consuming, as the images are rebuilt only when there’s a change in the bootstrap.ini file not otherwise.
- Add the images to WDS.
-
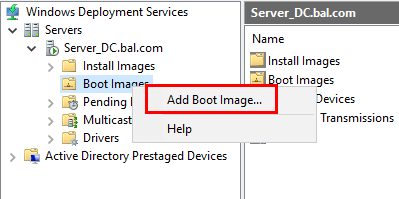
Open WDS right click Boot Images and select Add Boot Image. The path to the boot image is <DeploymentShareDirectory>\Boot\LiteTouchPE_x64.wim.
-
Perform the same as Step 2 for the Install Images. Add a new image group and select the image file. The path to the install image is <DeploymentShareDirectory>\Operating Systems\Windows Server 2016\sources\install.wim.
-
-
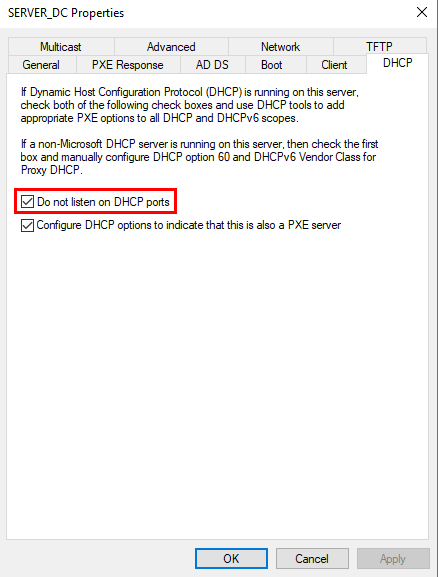
Modify the server properties in WDS to disable DHCP listen and always boot to PXE.
- With this our boot environment and OS files are all setup on the Windows side. Next we will configure Foreman to integrate with these operations.
Foreman Configurations
- Make sure that the DNS server has an entry for the WDS Server and that it is resolvable by the foreman instance.
-
Disable SSL in foreman settings.yaml, as MDT may report errors with unsigned certificate.
vi /etc/foreman/setinngs.yaml :require_ssl: false systemctl restart httpd - Configure the required components in the Foreman Web GUI to bind all things together:
- Architecture: Add a new architecture - x64.
- Installation Media: This will not be used but is a requirement for Foreman configurations. Create New Installation Media and add any information for the Name and Path. OS Family must be set to Windows.
- Partition Table: Partitioning is done as part of the task sequence, here it is just a requirement for Foreman. Create a New Partition Table, specify name and select the OS Family to be Windows. Add the following data:
<%# kind: ptable name: WDS default ptable oses: - Windows Server 2008 - Windows Server 2008 R2 - Windows Server 2012 - Windows Server 2012 R2 - Windows Server 2016 - Windows %>- Provisioning Templates:
-
Name - WDS Provision, Type - Provisioning Template
<?xml version="1.0" encoding="utf-8"?> <string xmlns="http://mydomain.com"><%= @host.shortname %></string> -
Name - WDS PXE, Type - PXELinux template. Change the IP to that of the WDS Server.
<% kind: PXELinux name: WDS PXE Chain oses: - Windows 10, - Windows 8.1/Server 2012R2 %> <% if @host.pxe_build? %> default Windows label Windows kernel pxechn.c32 append 172.16.1.2::\boot\x64\wdsnbp.com -W <% end %> -
Name - WDS User Data, Type - User Data Template<
<?xml version="1.0" encoding="utf-8"?>
<string><%= @host.operatingsystem.name %>_<%= @host.operatingsystem.major %>_<%= @host.operatingsystem.minor %></string>
-
-
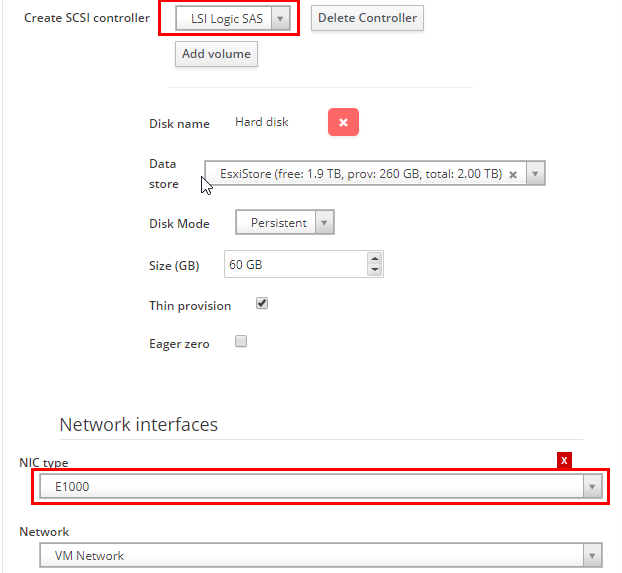
Compute Resource: Under the Computer Resource, add a new Compute Profile. Configure the VM settings. Make sure that SCSI controller is set to LSI Logic SAS, and NIC type is E1000. If this is not set, the MDT image will not recognize the drivers and the installation will fail.
-
Operating System: Create a new Operating System. The OS Name, Major and Minor Version must match to the task sequence ID. Associate the Templates, and the Installation Media to the OS.
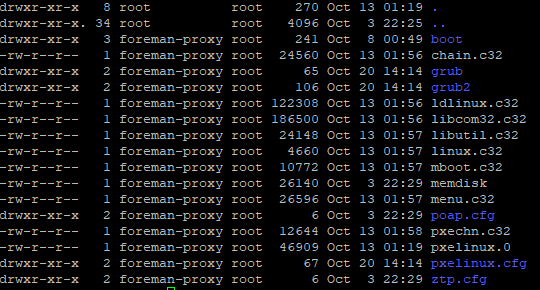
- Get the latest pxechn.c32 and libcom32.c32 files and place them in the TFTP root /var/lib/tftpboot. These files can be found as part of the syslinux package. Alternatively, download the latest syslinux package and update the following files.
- pxelinux.0
- chain.c32
- ldlinux.c32
- libcom32.c32
- libutil.c32
- linux.c32
- mboot.c32
- menu.c32
- pxechn.c32
All these files must be owned by the foreman-proxy with appropriate permissions.
Provisioning
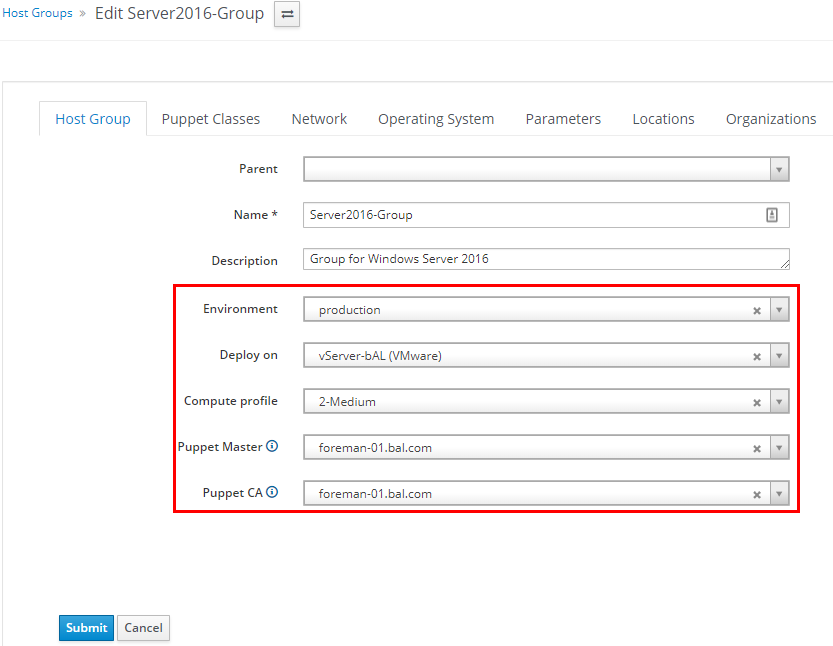
Host Group
- Configure>Host Groups>Create Host Group.
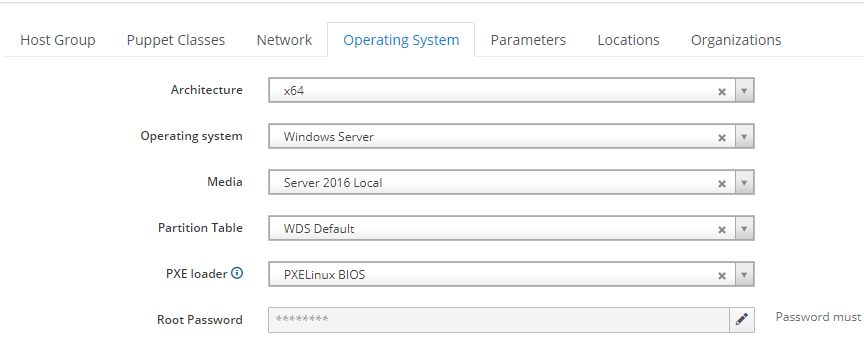
- Fill in information under all tabs.
- Submit.
Create Host
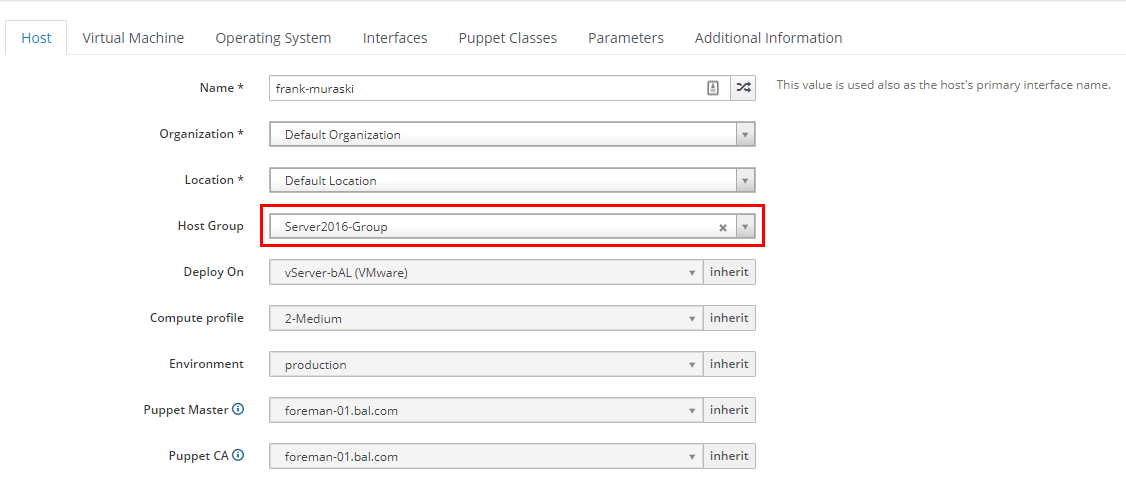
- Hosts>Create Host.
-
Enter the Hostname. Select the Host Group and it should automatically fill in all the information under all tabs.
- Submit.
Additional Configurations
Join Windows Domain
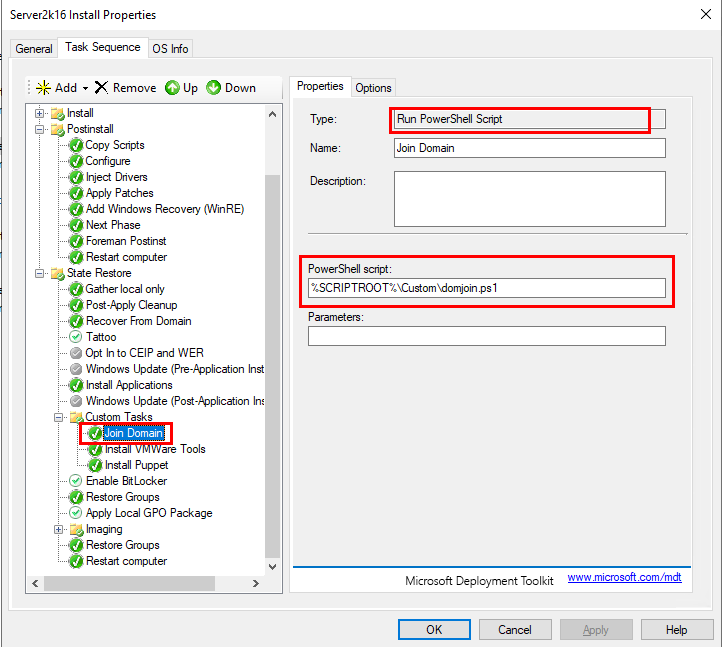
As part of the installation, you can add a simple script to the task sequence which joins the computer to a Windows Domain.
-
Create a new script in your Deployment Share. For example C:\DeploymentShare\Scripts\Custom\domjoin.ps1
#Domain Admin Username $strUser = "mydomain\myadmin" #Domain Name $strDomain = "mydomain.com" #Password for the Domain Admin $strPassword = ConvertTo-SecureString "P@ssw0rd" -AsPlainText -Force #Put all the credentials in one variable $Credentials = New-Object System.Management.Automation.PsCredential $strUser,$strPassword #Join Domain with the admin credentials. Add-computer -DomainName $strDomain -Credential $Credentials -
In your task sequence add a component that runs the above Powershell Script. A reboot must follow.
-
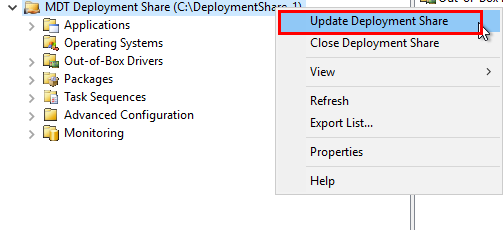
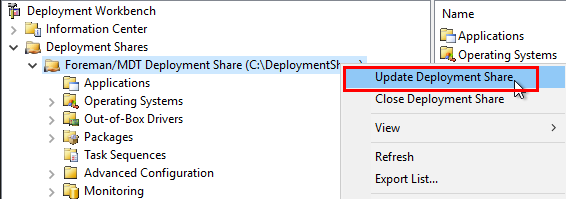
Click OK. Update the Deployment Share.
Install VMWare Tools
When the OS is provisioned as is, it will not have any drivers for I/O devices such as Keyboard, Mouse and Display Adapters. An easy fix instead of injecting selective drivers into the image is to install VMWare Tools. Installing VMWare tools will also install all the required drivers for the Virtual Machine.
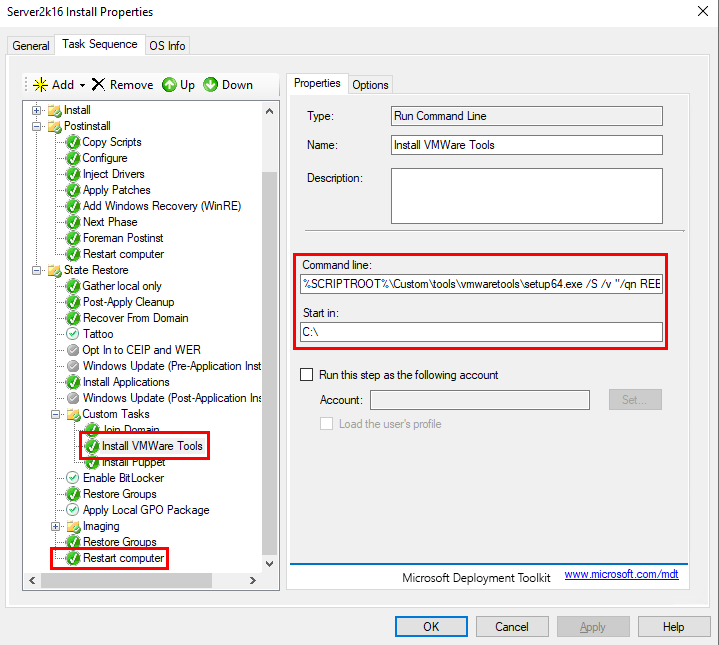
We will add a new step in the task sequence of the type Run Command Line, which will perform a command line install of VMWare Tools. VMWare Tools support command line installation and also allow passing various arguments.
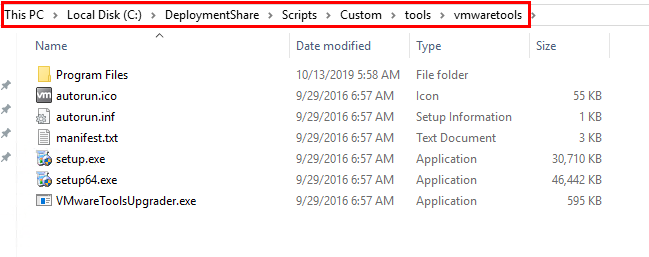
- Get the VMWare tools ISO from an ESXi host in your environment and extract it under the Deployment Share folder on your WDS, for example: C:\DeploymentShare\Scripts\Custom\tools\vmwaretools
-
Open the task sequence in Deployment Workbench and add a new step at the appropriate level. Also, add a Restart component which is performed after the VMWare tools install.
%SCRIPTROOT%\Custom\tools\vmwaretools\setup64.exe /S /v "/qn REBOOT=R ADDLOCAL=ALL REMOVE=Hgfs" - Click OK. Update the Deployment Share.
Install Puppet
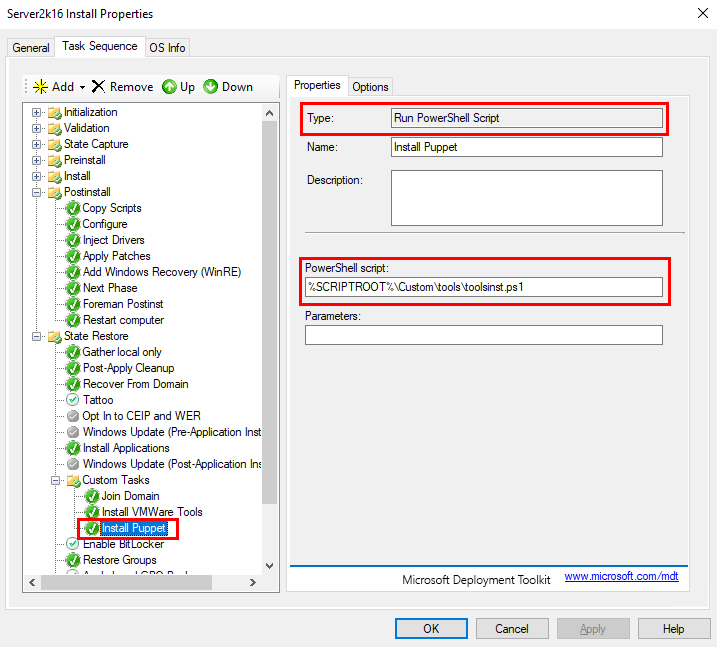
If you wish to install Puppet on your Windows system as part of the unattended provisioning a PowerShell script can be added to the task sequence which installs the puppet agent software and also set’s it’s configuratoin. The .msi file for the puppet agent package accepts various command line arguments if the user wishes to perform a command line installation. The arguments can be found here.
- Download Puppet Agent for Windows to a location under the Deployment Share directory. For example: C:\DeploymentShare\Scripts\custom\tools\puppetx64.msi
-
Create a new Powershell script and in the same directory, C:\DeploymentShare\Scripts\Custom\tools\toolsinst.ps1
#Directory for tools, change your server name/IP Address $toolpath="\\server_dc.mydomain.com\DeploymentShare$\Scripts\Custom\tools" #Install Puppet $puppetargs = "/qn /norestart /i $toolpath\puppetx64.msi PUPPET_MASTER_SERVER=foreman-01.mydomain.com PUPPET_AGENT_ACCOUNT_DOMAIN=mydomain.com PUPPET_AGENT_ACCOUNT_USER=myadmin PUPPET_AGENT_ACCOUNT_PASSWORD=P@$$w0rd" Start-Process msiexec.exe -Wait -ArgumentList "$puppetargs" -
Open your task sequence and add a new component that runs a PowerShell script. Enter the path of the Script.
- Hit OK. Update the Deployment share.
-
On your Puppet Master, add a wildcard autosign entry which will automatically sign all CSRs from the machines on your local domain.
vi /etc/puppetlabs/puppet/autosign.conf
   *.mydomain.com
Resources
BERYJU.ORG, https://beryju.org/en/blog/getting-started-foreman-part-2
