Exploring FortiGate’s Intervdom Links: A Comprehensive Guide
In this blog, we’ll explore the use cases for intervdom links, which are a powerful feature of Fortinet’s FortiGate firewall platform. Intervdom links allow for communication between virtual domains (VDOMs) on a single FortiGate device, while still maintaining separation and security between them.
By using intervdom links, organizations can achieve greater flexibility and control over their network environments, as well as simplify their network architecture and reduce costs.
Some of the common use cases for intervdom links include:
- Enabling communication between different business units or departments within an organization, while still maintaining separation and security between them.
- Allowing for secure communication between different tenants in a multi-tenant environment, such as a cloud or data center.
- Streamlining network architecture by consolidating multiple physical devices into a single FortiGate device.
- Facilitating easier management and configuration of multiple VDOMs within a single FortiGate device.
What is Inter-VDOM Link
VDOM links enable internal communication between VDOMs without requiring additional physical interfaces. Inter-VDOM routing refers to the communication between VDOMs, which is facilitated by VDOM links - virtual interfaces connecting VDOMs. Each VDOM link includes a pair of interfaces, with one connected to each VDOM, forming the endpoints of the inter-VDOM connection.
Types of Intervdom Links on Fortigate
- NPU-based VDOM Link: This type of interface provides a dedicated link between two VDOMs within the same FortiGate device. It is optimized for intra-device traffic between VDOMs and is designed to offload traffic processing from the CPU to the NPU for improved performance and reduced latency.
- CPU based Inter-VDOM: It refer to the use of software-based interfaces to connect VDOMs within a FortiGate firewall device. In contrast to NPU-based interfaces, CPU-based interfaces rely on the device’s CPU for packet processing and forwarding and doesnot support offloading traffic on NPU.
Configuration Example
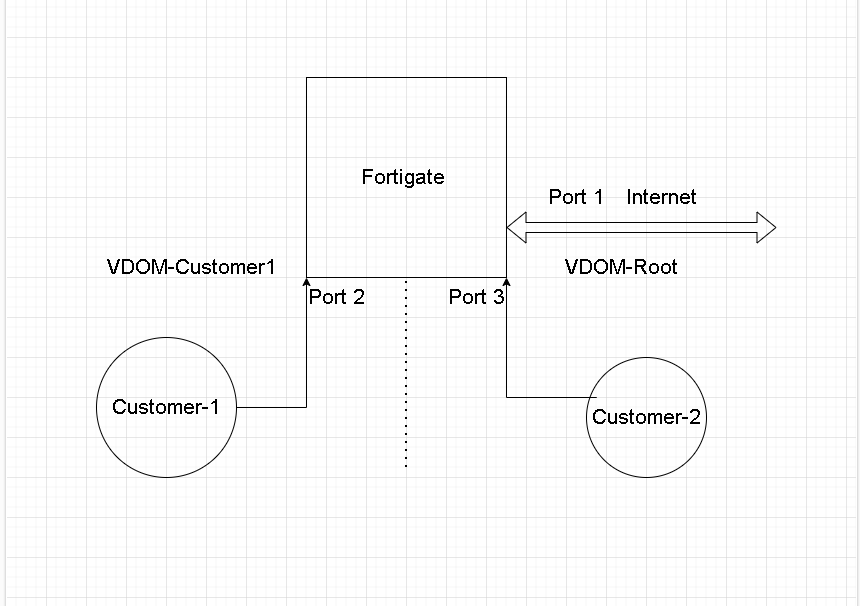
In this example, we’ll show you how to use an intervdom link to route traffic between two VDOMs: “Customer1” and “Root”.
Port 1 and Port 3 are members of the “Root” VDOM, while Port 2 is part of the “Customer1” VDOM. “Customer1” is connected to Port 2, and “Customer2” is connected to Port 3. The end goal is to connect “Customer1” to the internet using an intervdom link.
Enable Multi-VDOM on fortigate
config system global
    set vdom-mode multi-vdom  #This should be typed in manually. There is no auto-display.
End
Port Configuration
config system interface
    edit "port2"
        set vdom "Customer1"
        set ip 192.168.1.1 255.255.255.0
        set type physical
        set alias "Customer-1"
        set snmp-index 2
    next
end
    edit "port3"
        set vdom "root"
        set ip 172.20.1.1 255.255.255.0
        set type physical
        set alias "Customer-2"
        set snmp-index 3
    next
end
    edit "port1"
        set vdom "root"
        set ip x.x.x.x  255.255.240.0 # x.x.x.x is public Ip
        set allowaccess ping https ssh http telnet
        set type physical
        set alias "Internet"
        set snmp-index 1
    next
end
Inter-VDOM Link Configuration on Global
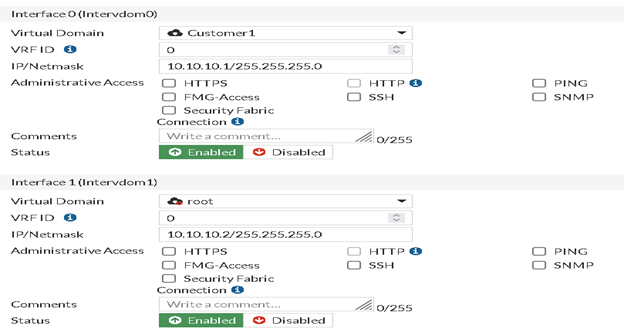
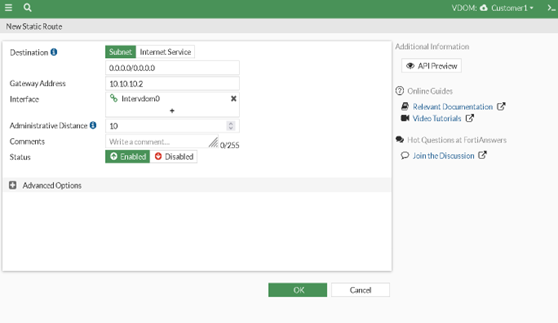
Then, we’ll configure a static route on the “Customer1” VDOM that directs traffic destined for the internet to the intervdom, which will in turn route the traffic to the “Root” VDOM and out to the internet via Port 1. By using an intervdom link and configuring the appropriate routing, we can enable “Customer1” to access the internet while keeping the two VDOMs separate and secure.
Make sure you have required policy to route traffic from Customer vdom to root vdom.

Root VDOM Configuration
To enable traffic from the “Customer1” VDOM to reach the internet via Port 1 on the “Root” VDOM, as well as traffic from Port 2 on the “Customer1” VDOM to reach Port 1, we need to create two policies on the “Root” VDOM.

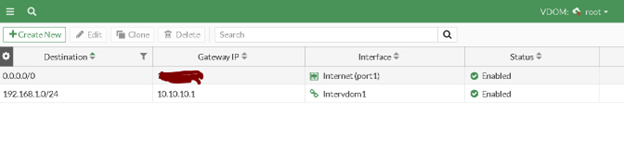
To enable traffic from “Customer1” to reach the internet via Port 1 on the “Root” VDOM, we need to create a static route that directs traffic destined for the internet to the Port 1 interface. Additionally, we’ll need to include a route for the “Customer1” subnet (192.168.1.0/24) in the routing table to prevent RPF (Reverse Path Forwarding) failure.
Testing Inter-VDOM traffic
After making the desired changes, we can see that we can successfully ping from Customer domain.
Fortigate (Customer1) # execute  ping 1.1.1.1
PING 1.1.1.1 (1.1.1.1): 56 data bytes
64 bytes from 1.1.1.1: icmp_seq=0 ttl=53 time=6.8 ms
64 bytes from 1.1.1.1: icmp_seq=1 ttl=53 time=7.6 ms
64 bytes from 1.1.1.1: icmp_seq=2 ttl=53 time=9.1 ms
Analyzing Packet Sniffer for Inter-VDOM traffic
Fortigate# diagnose  sniffer packet  any 'icmp and host 1.1.1.1' 4 0 l
Using Original Sniffing Mode
interfaces=[any]
filters=[icmp and host 1.1.1.1]
2023-03-29 22:03:50.457462 Intervdom0 out 10.10.10.1 -> 1.1.1.1: icmp: echo request
2023-03-29 22:03:50.457470 Intervdom1 in 10.10.10.1 -> 1.1.1.1: icmp: echo request
2023-03-29 22:03:50.457552 port1 out 10.9.10.92 -> 1.1.1.1: icmp: echo request
2023-03-29 22:03:50.465334 port1 in 1.1.1.1 -> 10.9.10.92: icmp: echo reply
2023-03-29 22:03:50.465377 Intervdom1 out 1.1.1.1 -> 10.10.10.1: icmp: echo reply
2023-03-29 22:03:50.465381 Intervdom0 in 1.1.1.1 -> 10.10.10.1: icmp: echo reply